Snipe #6715 Restoration Progress
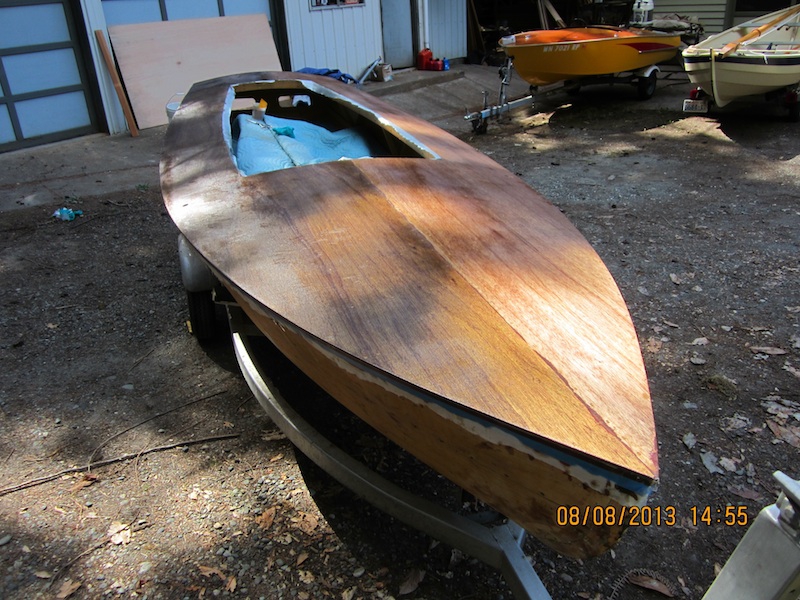
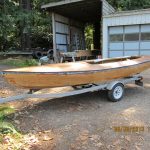
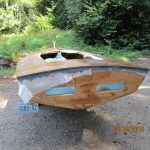
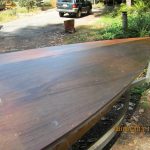
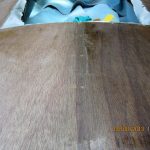
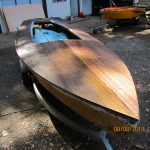
By John D. Rose Photos of the Snipe after the new meranti plywood decking was installed and epoxy-fiberglassed with 4 oz. cloth. Things I've learned (for the next restoration, on Snipe #16228): 1. Meranti plywood comes in several shades - light ("white"), yellow, light red (similar to mahogany), dark red (brown, like walnut almost). I used two panels of 6mm (1/4") plywood, one was light red both sides, the other was light red on one side and dark red on the other. Unfortunately, the boat builder did not notice that difference, so one panel had a dark top surface and the other had a lighter surface color, as can be seen in the photos. We tried bleaching the darker side to no avail. Actually, although the grain pattern of both panels is attractive, the walnut-like brown shade of the dark red meranti would not be appealing for this deck application when varnished. ...
By John D. Rose
Photos of the Snipe after the new meranti plywood decking was installed and epoxy-fiberglassed with 4 oz. cloth.
Things I’ve learned (for the next restoration, on Snipe #16228):
1. Meranti plywood comes in several shades – light (“white”), yellow, light red (similar to mahogany), dark red (brown, like walnut almost). I used two panels of 6mm (1/4″) plywood, one was light red both sides, the other was light red on one side and dark red on the other. Unfortunately, the boat builder did not notice that difference, so one panel had a dark top surface and the other had a lighter surface color, as can be seen in the photos. We tried bleaching the darker side to no avail. Actually, although the grain pattern of both panels is attractive, the walnut-like brown shade of the dark red meranti would not be appealing for this deck application when varnished.
…
2. The epoxy and fiberglass cloth went on easily, the cloth was “dry laid” and then saturated with epoxy (West Systems, preferred by the boat builder) and squee-geed out with a plastic blade used for epoxy work. The grain of the plywood shows beautifully, the cloth is almost invisible. With one coat of resin (no surplus left on the surface), the surface has a cloth weave pattern like canvas decking. The boat builder will lightly sand the surface and apply another coat of epoxy resin mixed with fairing filler (West Systems) to fill the weave in one coat – but it will be opaque because of the filler, so no varnishing of the deck is possible. [If the deck was to be varnished, he would apply one and maybe two coats of resin, to maintain the clear sheathing and allow the grain pattern to show.]
3. I chose meranti plywood because of the unique grain pattern which is more interesting than the next option (Okoume plywood, which has a uniform plain grain with no pattern). However, for any future work, I will use Okoume plywood which although plain in appearance, varnishes to a very attractive yellow-honey color uniform finished appearance.
So now, the #6715 Snipe will not look exactly like it did when new (all varnished hull and deck), but it will be attractive. I have chosen a custom-mix color for the hull (oil-based alkyd enamel) which simulates varnished wood, I call it honey color (like orangish-yellow). I will run a 2″ painted stripe around the edge of the deck (sides and transom) of the same color as the hull. The deck will be painted an off-white cream color, which will complement the hull color (based on several varnished Snipes and inland lake C scows that I used to sail on that had that color scheme – varnished hull and cream color canvas deck). The wood trim like splashboards and cockpit coaming and rubrails, will be varnished.
For the rubrails, I looked at a wooden runabout that the boat builder owns, it has a wooden rubrail (one piece) of similar dimensions to what is used on Snipes, plus a rounded aluminum rubrail screwed to the wooden rubrail. I decided to use that configuration on the Snipe too, it will be more damage resistant than the two-piece wooden rubrail, and easier to hike out on because of the rounded contour.
I think all of this will turn out OK in the end. I was hoping to simulate an all-varnished boat, but that will have to wait for #16228.
The next step after the next application of epoxy-fairing resin on the deck, will be to turn the boat over and epoxy-fix some spots on the outer keel around the daggerboard trunk, then epoxy-fair the hull, then apply epoxy-4 oz fiberglass cloth to the hull sides, transom and bottom. The boat builder has a unique strapping arrangement to lift and rotate the hull, using polyurethane boat trailer rollers attached to roof framing trusses, and nylon webbing for the turning straps, and a block and tackle arrangement to lift the boat while hanging in the webbing. I will try to take photos of that technique.
Leave a reply
Your email address will not be published. Your comment will be revised by the site if needed.

0 comments